逆向工程
MyBatis 逆向工程全指南:从配置到高级定制(含 IDEA 实战与避坑)
MyBatis 逆向工程(MyBatis Generator,简称 MBG)是 MyBatis 官方提供的代码生成工具,可根据数据库表自动生成 实体类、Mapper 接口、Mapper XML 文件,大幅减少重复的 CRUD 代码编写工作。 依赖优化、高级配置(如分页 / 注释 / 逻辑删除)、IDEA 快捷配置、常见问题解决方案 及 工程化最佳实践,帮助你高效落地逆向工程。
逆向工程核心依赖与版本选型
1. Maven 依赖配置
<dependencies>
    <!-- MyBatis 核心依赖 -->
    <dependency>
        <groupId>org.mybatis</groupId>
        <artifactId>mybatis</artifactId>
        <version>3.5.16</version>
    </dependency>

    <!-- MyBatis 逆向工程核心包 -->
    <dependency>
        <groupId>org.mybatis.generator</groupId>
        <artifactId>mybatis-generator-core</artifactId>
        <version>1.4.2</version> <!-- 最新稳定版,修复旧版bug -->
        <scope>provided</scope> <!-- 仅编译期使用,避免打包到生产环境 -->
    </dependency>

    <!-- MySQL 驱动(需与数据库版本匹配,8.0+用8.x版本) -->
    <dependency>
        <groupId>mysql</groupId>
        <artifactId>mysql-connector-java</artifactId>
        <version>8.0.33</version>
        <scope>runtime</scope>
    </dependency>

    <!-- 日志依赖(便于查看逆向工程执行日志,可选) -->
    <dependency>
        <groupId>org.slf4j</groupId>
        <artifactId>slf4j-api</artifactId>
        <version>1.7.36</version>
    </dependency>
    <dependency>
        <groupId>org.slf4j</groupId>
        <artifactId>slf4j-simple</artifactId>
        <version>1.7.36</version>
        <scope>test</scope>
    </dependency>
</dependencies>

<!-- 可选:配置 Maven 插件,通过命令行执行逆向工程 -->
<build>
    <plugins>
        <plugin>
            <groupId>org.mybatis.generator</groupId>
            <artifactId>mybatis-generator-maven-plugin</artifactId>
            <version>1.4.2</version>
            <configuration>
                <!-- 逆向工程配置文件路径 -->
                <configurationFile>src/main/resources/generatorConfig.xml</configurationFile>
                <!-- 执行后是否覆盖已有文件(建议开发期设为true) -->
                <overwrite>true</overwrite>
                <!-- 打印执行日志 -->
                <verbose>true</verbose>
            </configuration>
            <dependencies>
                <!-- 插件依赖的数据库驱动(避免版本冲突) -->
                <dependency>
                    <groupId>mysql</groupId>
                    <artifactId>mysql-connector-java</artifactId>
                    <version>8.0.33</version>
                </dependency>
            </dependencies>
        </plugin>
    </plugins>
</build>
逆向工程配置文件深度解析
1. 完整配置文件(generatorConfig.xml)
<generatorConfiguration>
<!-- 可选:引入外部属性文件(解耦数据库配置,支持多环境) -->
<properties resource="db.properties"/>
<!-- 上下文配置:targetRuntime 决定生成风格 -->
<!-- MyBatis3:生成基本CRUD + 动态SQL(推荐);MyBatis3Simple:仅生成基本CRUD -->
<context id="MySQLContext" targetRuntime="MyBatis3" defaultModelType="flat">
<!-- 1. 注释生成器:控制是否生成注释及注释内容 -->
<commentGenerator>
<!-- 禁止生成所有注释(推荐,避免自动生成的冗余注释) -->
<property name="suppressAllComments" value="true"/>
<!-- 禁止生成日期注释(可选) -->
<property name="suppressDate" value="true"/>
<!-- 生成数据库表字段注释(若需要保留字段注释,设为true) -->
<property name="addRemarkComments" value="false"/>
</commentGenerator>
<!-- 2. 数据库连接配置(引用外部properties文件) -->
<jdbcConnection
driverClass="${jdbc.driver}"
connectionURL="${jdbc.url}"
userId="${jdbc.username}"
password="${jdbc.password}">
<!-- MySQL 8.0+ 必须添加此配置,解决时区问题及information_schema查询异常 -->
<property name="serverTimezone" value="UTC"/>
<!-- 解决 MySQL 8.0+ 中生成器无法识别某些数据类型的问题 -->
<property name="nullCatalogMeansCurrent" value="true"/>
</jdbcConnection>
<!-- 3. 数据类型解析器:控制数据库类型与Java类型的映射 -->
<javaTypeResolver>
<!-- false:DECIMAL/NUMERIC 映射为 Integer(适合业务中无高精度需求场景) -->
<!-- true:映射为 java.math.BigDecimal(适合金融等高精度场景) -->
<property name="forceBigDecimals" value="false"/>
<!-- 日期类型映射:DATE→java.sql.Date,TIME→java.sql.Time,TIMESTAMP→java.sql.Timestamp -->
<property name="useJSR310Types" value="false"/> <!-- 若需LocalDateTime,设为true -->
</javaTypeResolver>
<!-- 4. 实体类(Model)生成配置 -->
<javaModelGenerator
targetPackage="com.zhanghe.study.mybatis.model" <!-- 生成路径(包名) -->
targetProject="./src/main/java"> <!-- 项目路径(相对/绝对路径) -->
<!-- 是否按数据库schema生成子包(如schema为test,生成com.xxx.model.test) -->
<property name="enableSubPackages" value="false"/>
<!-- 去除字符串前后空格(避免数据库字段值含空格导致的业务问题) -->
<property name="trimStrings" value="true"/>
<!-- 生成的实体类是否不可变(final修饰,适合值对象场景,默认false) -->
<property name="immutable" value="false"/>
</javaModelGenerator>
<!-- 5. Mapper XML 生成配置 -->
<sqlMapGenerator
targetPackage="mapper" <!-- XML存放路径(resources下的包名) -->
targetProject="./src/main/resources">
<property name="enableSubPackages" value="false"/>
</sqlMapGenerator>
<!-- 6. Mapper 接口生成配置 -->
<javaClientGenerator
type="XMLMAPPER" <!-- 生成方式:XMLMAPPER(接口+XML分离)、ANNOTATEDMAPPER(纯注解) -->
targetPackage="com.zhanghe.study.mybatis.mapper" <!-- 接口存放路径 -->
targetProject="./src/main/java">
<property name="enableSubPackages" value="false"/>
</javaClientGenerator>
<!-- 7. 数据库表映射配置(核心:指定要生成的表) -->
<!-- 表1:student → 实体类 Student -->
<table tableName="student" domainObjectName="Student"
enableCountByExample="false" enableUpdateByExample="false"
enableDeleteByExample="false" enableSelectByExample="false">
<!-- 配置主键生成策略(MySQL自增主键) -->
<generatedKey column="id" sqlStatement="MySQL" identity="true"/>
<!-- 字段映射:若数据库字段与实体属性名不一致,手动指定(如user_name→userName,开启驼峰可省略) -->
<!-- <columnOverride column="user_name" property="userName"/> -->
<!-- 逻辑删除字段配置:标记字段为逻辑删除(如is_deleted,生成代码时会忽略该字段的删除逻辑) -->
<!-- <columnOverride column="is_deleted" javaType="Integer" /> -->
</table>
<!-- 表2:classes → 实体类 Classes(多表配置示例) -->
<table tableName="classes" domainObjectName="Classes"
enableCountByExample="false" enableUpdateByExample="false"
enableDeleteByExample="false" enableSelectByExample="false">
<generatedKey column="id" sqlStatement="MySQL" identity="true"/>
</table>
</context>
</generatorConfiguration>2. 外部属性文件(db.properties)
将数据库配置单独抽取,便于环境切换:
# MySQL 8.0+ 配置
jdbc.driver=com.mysql.cj.jdbc.Driver
jdbc.url=jdbc:mysql://localhost:3306/mybatis?useSSL=false&serverTimezone=UTC&characterEncoding=utf8&allowPublicKeyRetrieval=true
jdbc.username=root
jdbc.password=123456

# 若为 MySQL 5.x,驱动和URL需调整:
# jdbc.driver=com.mysql.jdbc.Driver
# jdbc.url=jdbc:mysql://localhost:3306/mybatis?useSSL=false&characterEncoding=utf8
3. 关键配置项解读
| 配置节点 | 核心属性 / 子节点 | 作用说明 |
|---|---|---|
context |
targetRuntime="MyBatis3" |
生成 MyBatis 3.x 风格代码,包含动态 SQL(如 Example 类,可选关闭) |
commentGenerator |
suppressAllComments="true" |
禁止生成冗余注释,保持代码整洁 |
jdbcConnection |
nullCatalogMeansCurrent="true" |
解决 MySQL 8.0+ 中生成器无法识别表的问题(关键配置,否则可能生成空代码) |
javaModelGenerator |
trimStrings="true" |
自动去除字符串字段的前后空格,避免业务异常 |
table |
enableXXXByExample="false" |
关闭 Example 类生成(Example 适合复杂查询,简单场景可关闭以减少代码量) |
table |
<generatedKey> |
配置主键生成策略(如 MySQL 自增 identity="true") |
table |
<columnOverride> |
手动映射字段(如数据库字段名与实体属性名不一致时) |
逆向工程执行方式(3 种主流方式)
1. Java 类执行(适合调试)
import org.mybatis.generator.api.MyBatisGenerator;
import org.mybatis.generator.config.Configuration;
import org.mybatis.generator.config.xml.ConfigurationParser;
import org.mybatis.generator.exception.InvalidConfigurationException;
import org.mybatis.generator.exception.XMLParserException;
import org.mybatis.generator.internal.DefaultShellCallback;

import java.io.File;
import java.io.IOException;
import java.sql.SQLException;
import java.util.ArrayList;
import java.util.List;

public class GeneratorMain {
    public static void main(String[] args) {
        List<String> warnings = new ArrayList<>();
        boolean overwrite = true; // 是否覆盖已有文件(开发期建议true)
        String configPath = "src/main/resources/generatorConfig.xml"; // 配置文件路径

        // 获取配置文件(兼容 IDEA 工作目录问题)
        File configFile = new File(configPath);
        if (!configFile.exists()) {
            throw new RuntimeException("逆向工程配置文件不存在:" + configPath);
        }

        try {
            // 解析配置文件
            ConfigurationParser parser = new ConfigurationParser(warnings);
            Configuration config = parser.parseConfiguration(configFile);

            // 执行生成
            DefaultShellCallback callback = new DefaultShellCallback(overwrite);
            MyBatisGenerator generator = new MyBatisGenerator(config, callback, warnings);
            generator.generate(null); // null 表示不指定自定义生成器

            // 打印警告(若有)
            for (String warning : warnings) {
                System.out.println("警告:" + warning);
            }
            System.out.println("逆向工程执行完成!");
        } catch (IOException | XMLParserException | InvalidConfigurationException | SQLException | InterruptedException e) {
            e.printStackTrace();
        }
    }
}
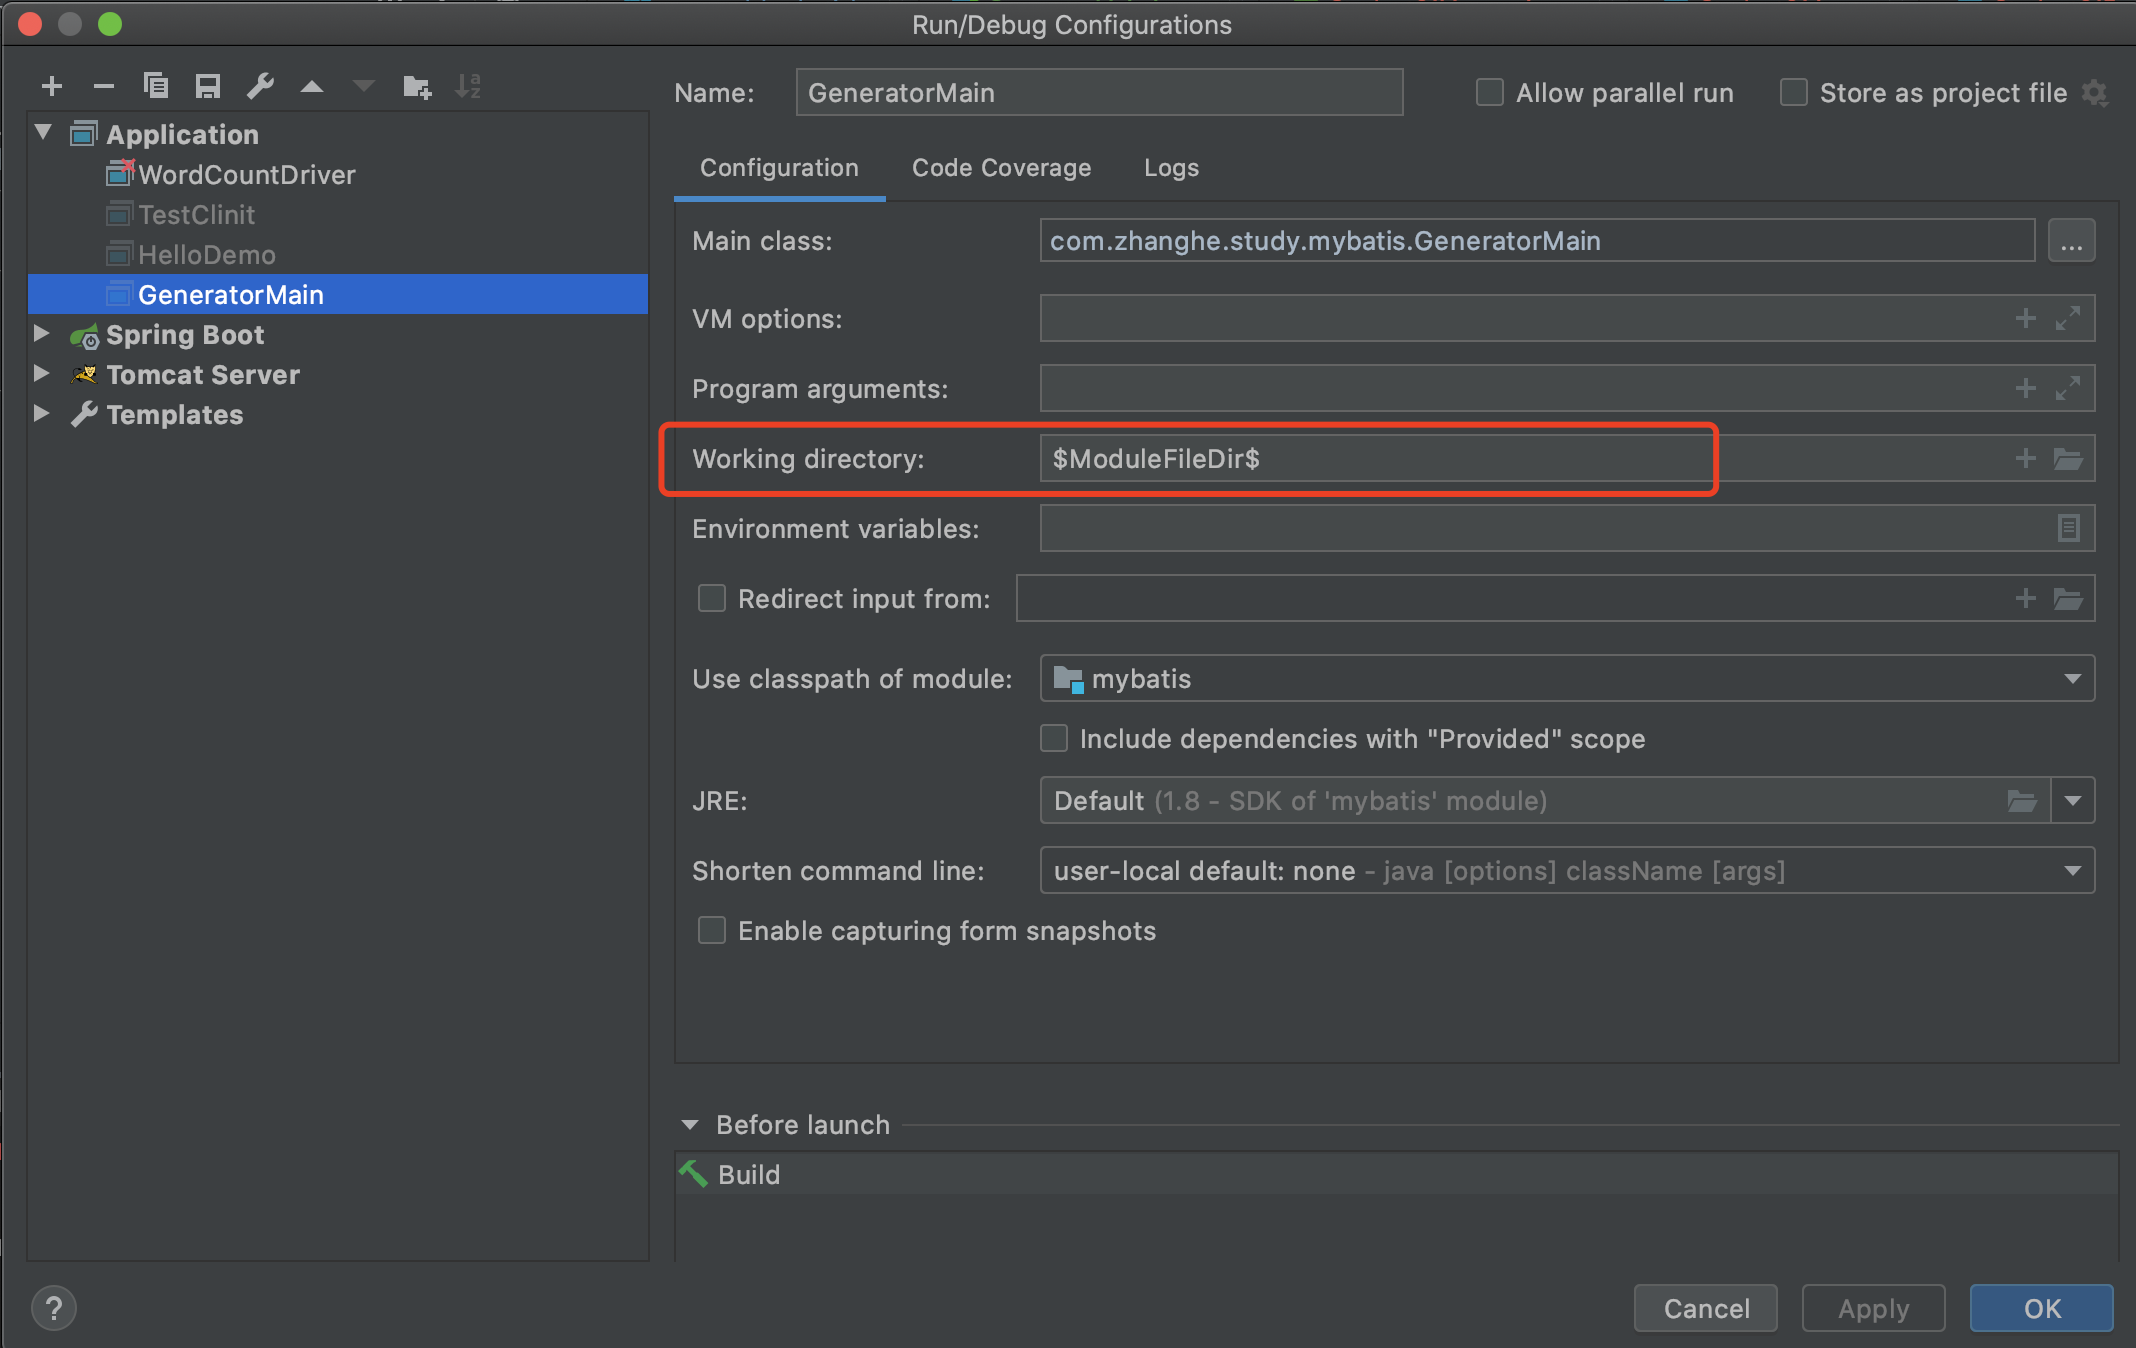
IDEA 避坑:Working Directory 配置
IDEA 路径问题是高频坑,解决方案如下:
- 右键
GeneratorMain→Edit Configurations; - 在
Configuration标签下,将Working directory改为 (当前模块根目录); - 点击
Apply→OK,重新运行即可(避免路径相对于工作空间导致配置文件找不到)。
2. Maven 插件执行(推荐,适合团队协作)
配置好前文的 mybatis-generator-maven-plugin 后,可通过 Maven 命令直接执行:
- 打开 IDEA 的
Maven面板(右侧); - 展开项目 →
Plugins→mybatis-generator; - 双击
mybatis-generator:generate,即可执行逆向工程。
优势:
- 无需编写 Java 执行类,配置即执行;
- 团队成员统一依赖插件,避免环境差异;
- 可集成到 CI/CD 流程(如 Jenkins 自动生成代码)。
3. IDEA 插件执行(快捷方式,适合高频使用)
安装 MyBatis Generator 插件,通过图形化界面执行:
- 打开 IDEA →
File→Settings→Plugins; - 搜索
MyBatis Generator,安装并重启 IDEA; - 右键
generatorConfig.xml→MyBatis Generator→Generate MyBatis Artifacts; - 在弹出的窗口中确认配置,点击
Run即可。
生成代码结构与使用示例
以 student 表为例,逆向工程会生成以下 3 类文件:
1. 实体类(Student.java)
package com.zhanghe.study.mybatis.model;

public class Student {
    private Integer id;
    private String name;
    private Integer classId; // 数据库字段 class_id 自动转为驼峰 classId(默认开启)
    private Integer age;

    // 无参构造、全参构造(视配置而定)
    // getter/setter 方法
    // toString 方法(默认生成)
}
2. Mapper 接口(StudentMapper.java)
package com.zhanghe.study.mybatis.mapper;
import com.zhanghe.study.mybatis.model.Student;
import org.apache.ibatis.annotations.Delete;
import org.apache.ibatis.annotations.Insert;
import org.apache.ibatis.annotations.Result;
import org.apache.ibatis.annotations.Results;
import org.apache.ibatis.annotations.Select;
import org.apache.ibatis.annotations.Update;
public interface StudentMapper {
// 根据主键删除
int deleteByPrimaryKey(Integer id);
// 插入(全字段)
// 自增主键返回
int insert(Student record);
// 插入(非空字段)
int insertSelective(Student record);
// 根据主键查询
Student selectByPrimaryKey(Integer id);
// 更新(非空字段)
int updateByPrimaryKeySelective(Student record);
// 更新(全字段)
int updateByPrimaryKey(Student record);
}3. Mapper XML 文件(StudentMapper.xml)
存放于 src/main/resources/mapper/ 目录下,包含动态 SQL 语句(如 insertSelective、updateByPrimaryKeySelective 的实现):
<mapper namespace="com.zhanghe.study.mybatis.mapper.StudentMapper">
<resultMap id="BaseResultMap" type="com.zhanghe.study.mybatis.model.Student">
<id column="id" property="id" jdbcType="INTEGER"/>
<result column="name" property="name" jdbcType="VARCHAR"/>
<result column="class_id" property="classId" jdbcType="INTEGER"/>
<result column="age" property="age" jdbcType="INTEGER"/>
</resultMap>
<sql id="Base_Column_List">
id, name, class_id, age
</sql>
<select id="selectByPrimaryKey" resultMap="BaseResultMap" parameterType="java.lang.Integer">
select
<include refid="Base_Column_List"/>
from student
where id = #{id,jdbcType=INTEGER}
</select>
<delete id="deleteByPrimaryKey" parameterType="java.lang.Integer">
delete from student
where id = #{id,jdbcType=INTEGER}
</delete>
<insert id="insert" parameterType="com.zhanghe.study.mybatis.model.Student">
insert into student (id, name, class_id,
age)
values (#{id,jdbcType=INTEGER}, #{name,jdbcType=VARCHAR}, #{classId,jdbcType=INTEGER},
#{age,jdbcType=INTEGER})
</insert>
<insert id="insertSelective" parameterType="com.zhanghe.study.mybatis.model.Student">
insert into student
<trim prefix="(" suffix=")" suffixOverrides=",">
<if test="id != null">
id,
</if>
<if test="name != null">
name,
</if>
<if test="classId != null">
class_id,
</if>
<if test="age != null">
age,
</if>
</trim>
<trim prefix="values (" suffix=")" suffixOverrides=",">
<if test="id != null">
#{id,jdbcType=INTEGER},
</if>
<if test="name != null">
#{name,jdbcType=VARCHAR},
</if>
<if test="classId != null">
#{classId,jdbcType=INTEGER},
</if>
<if test="age != null">
#{age,jdbcType=INTEGER},
</if>
</trim>
</insert>
<update id="updateByPrimaryKeySelective" parameterType="com.zhanghe.study.mybatis.model.Student">
update student
<set>
<if test="name != null">
name = #{name,jdbcType=VARCHAR},
</if>
<if test="classId != null">
class_id = #{classId,jdbcType=INTEGER},
</if>
<if test="age != null">
age = #{age,jdbcType=INTEGER},
</if>
</set>
where id = #{id,jdbcType=INTEGER}
</update>
<update id="updateByPrimaryKey" parameterType="com.zhanghe.study.mybatis.model.Student">
update student
set name = #{name,jdbcType=VARCHAR},
class_id = #{classId,jdbcType=INTEGER},
age = #{age,jdbcType=INTEGER}
where id = #{id,jdbcType=INTEGER}
</update>
</mapper>4. 代码使用示例(Spring Boot 环境)
import com.zhanghe.study.mybatis.mapper.StudentMapper;
import com.zhanghe.study.mybatis.model.Student;
import org.junit.jupiter.api.Test;
import org.springframework.beans.factory.annotation.Autowired;
import org.springframework.boot.test.context.SpringBootTest;
public class StudentMapperTest {
private StudentMapper studentMapper;
// 新增学生(非空字段插入)
public void testInsertSelective() {
Student student = new Student();
student.setName("张三");
student.setClassId(1);
student.setAge(18);
int rows = studentMapper.insertSelective(student);
System.out.println("插入行数:" + rows);
System.out.println("自增主键:" + student.getId()); // 自动获取主键
}
// 根据ID查询学生
public void testSelectByPrimaryKey() {
Student student = studentMapper.selectByPrimaryKey(1);
System.out.println(student); // 输出:Student(id=1, name=张三, classId=1, age=18)
}
// 更新学生(仅更新非空字段)
public void testUpdateByPrimaryKeySelective() {
Student student = new Student();
student.setId(1);
student.setAge(19); // 仅更新年龄
int rows = studentMapper.updateByPrimaryKeySelective(student);
System.out.println("更新行数:" + rows);
}
}高级定制:满足复杂业务需求
1. 生成 Example 类(支持复杂查询)
若业务需要多条件动态查询(如模糊查询、范围查询),可开启 Example 类生成(默认关闭):
<table tableName="student" domainObjectName="Student"
       enableCountByExample="true" enableUpdateByExample="true"
       enableDeleteByExample="true" enableSelectByExample="true">
    <generatedKey column="id" sqlStatement="MySQL" identity="true"/>
</table>
Example 类使用示例(多条件查询)
// 查询:班级ID=1 且 年龄>15 的学生
public void testSelectByExample() {
StudentExample example = new StudentExample();
StudentExample.Criteria criteria = example.createCriteria();
criteria.andClassIdEqualTo(1); // 班级ID=1
criteria.andAgeGreaterThan(15); // 年龄>15
// 可选:排序(按年龄降序)
example.setOrderByClause("age desc");
List<Student> students = studentMapper.selectByExample(example);
System.out.println("查询结果数:" + students.size());
}2. 适配分页插件(如 PageHelper)
逆向工程生成的代码可直接与 PageHelper 结合使用,无需额外修改:
import com.github.pagehelper.PageHelper;
import com.github.pagehelper.PageInfo;
public void testSelectWithPage() {
// 分页参数:第1页,每页10条
PageHelper.startPage(1, 10);
// 执行查询(PageHelper 自动拦截 SQL 加分页)
List<Student> students = studentMapper.selectByExample(null); // null 表示查询所有
// 封装分页结果
PageInfo<Student> pageInfo = new PageInfo<>(students);
System.out.println("总条数:" + pageInfo.getTotal());
System.out.println("总页数:" + pageInfo.getPages());
System.out.println("当前页数据:" + pageInfo.getList());
}3. 逻辑删除配置
若表含逻辑删除字段(如 is_deleted,0 = 未删除,1 = 已删除),可通过 columnOverride 配置,生成代码时自动过滤已删除数据:
<table tableName="student" domainObjectName="Student">
    <generatedKey column="id" sqlStatement="MySQL" identity="true"/>
    <!-- 逻辑删除字段配置:javaType 指定字段类型 -->
    <columnOverride column="is_deleted" javaType="Integer">
        <!-- 生成查询 SQL 时自动添加条件:is_deleted = 0 -->
        <property name="runtimeSqlStatement" value="(CASE WHEN is_deleted = 0 THEN 1 ELSE 0 END) = 1"/>
    </columnOverride>
</table>
效果:
生成的 selectByPrimaryKey、selectByExample 等查询 SQL 会自动添加 WHERE is_deleted = 0,无需手动过滤逻辑删除数据。
常见问题与解决方案
1. 生成代码为空(无实体类 / Mapper)
- 原因 1:数据库连接配置错误(如 URL 中未加
nullCatalogMeansCurrent=true,MySQL 8.0+ 必加); - 原因 2:表名拼写错误(如配置
tableName="studnet",实际表名是student); - 原因 3:
targetProject路径错误(如写成./src/main/java/,多了斜杠,应改为./src/main/java); - 解决方案:检查数据库连接日志(添加 SLF4J 依赖),确认表是否被正确识别。
2. 主键自增不生效(id 为 null)
原因 1:未配置
<generatedKey>标签,或identity="true"未设置;原因 2:数据库表主键未设置自增(需先在数据库中开启主键自增);
解决方案:
<generatedKey column="id" sqlStatement="MySQL" identity="true"/>
3. IDEA 中配置文件找不到(FileNotFoundException)
- 原因:
Working directory未设置为 ,导致路径相对于工作空间而非模块; - 解决方案:按前文步骤修改 IDEA 的 Run Configuration,或使用绝对路径(不推荐)。
4. 生成的实体类字段名与数据库不一致
原因 1:未开启驼峰命名映射(如
class_id未转为classId);原因 2:特殊字段名(如含下划线、大写字母)未手动映射;
解决方案:
开启 MyBatis 全局驼峰配置(
mapUnderscoreToCamelCase=true);手动映射特殊字段:
<columnOverride column="user_name" property="userName"/>
工程化最佳实践
- 代码生成后不修改:逆向工程生成的代码(尤其是 Mapper 接口和 XML)应视为 “自动生成代码”,避免手动修改;若需扩展功能(如自定义查询),在 Mapper 接口中新增方法,在 XML 中新增 SQL(不修改自动生成的内容)。
- 版本控制忽略自动生成代码:在
.gitignore中添加自动生成目录(如src/main/java/com/xxx/model/*),避免团队协作时冲突。 - 分环境配置:通过
properties标签引入不同环境的数据库配置(开发 / 测试 / 生产),避免频繁修改generatorConfig.xml。 - 定期更新代码:当数据库表结构变更(如新增字段)时,重新执行逆向工程(开启
overwrite=true),覆盖旧代码,确保代码与表结构一致。
总结
MyBatis 逆向工程是提升开发效率的关键工具,通过合理配置可自动生成 80% 以上的 CRUD 代码,减少重复劳动。核心步骤为:
- 配置依赖与
generatorConfig.xml(重点关注数据库连接、代码路径、表映射); - 选择合适的执行方式(Java 类 / Maven 插件 / IDEA 插件);
- 根据业务需求进行高级定制(如
Example类、逻辑删除、分页适配); - 遵循工程化规范,避免手动修改自动生成代码,确保可维护性