Maven 私服:基于 Nexus 的私有仓库搭建与使用指南
在团队开发中,Maven 私服是提升依赖管理效率的核心工具。它不仅能缓存中央仓库的依赖,还能存储团队内部的私有构件(如自研 Jar 包),避免重复下载,加速构建过程。本文将详细介绍如何使用 Nexus 搭建 Maven 私服,以及如何配置项目与私服交互。
什么是 Maven 私服?
Maven 私服是部署在本地网络中的私有仓库管理器,主要作用包括:
- 缓存公共仓库:代理 Maven 中央仓库、阿里云仓库等,减少外部网络依赖。
- 存储私有构件:团队内部开发的组件(如工具类 Jar 包)可部署到私服,供其他项目依赖。
- 版本管控:区分快照版(Snapshot)和发布版(Release)构件,规范版本管理。
- 权限控制:限制谁能上传 / 下载构件,保障代码安全。
最常用的私服工具是 Nexus Repository Manager,本文以 Nexus 为例讲解。
Nexus 仓库类型与内置仓库
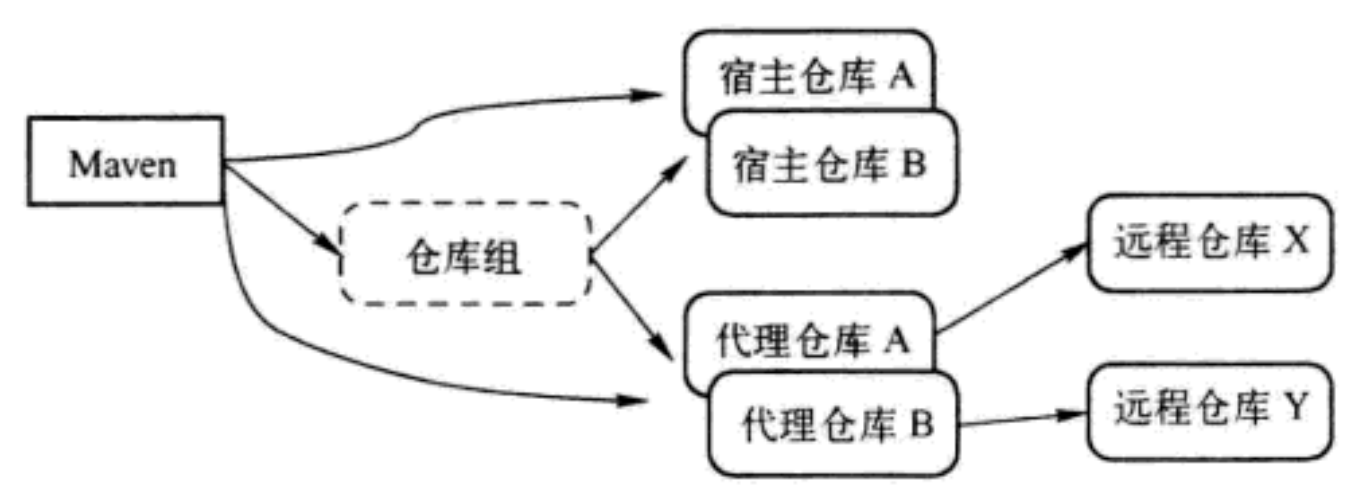
Nexus 提供四种仓库类型,各司其职:
| 仓库类型 | 作用 | 典型场景 |
|---|---|---|
group(仓库组) |
聚合多个仓库,提供统一访问入口 | 项目通过一个 URL 访问多个仓库(如同时访问中央仓库和私有仓库) |
hosted(宿主仓库) |
存储本地私有构件 | 部署团队自研的 Release 版或 Snapshot 版构件 |
proxy(代理仓库) |
代理远程公共仓库,缓存下载的构件 | 代理 Maven 中央仓库、阿里云仓库等 |
virtual(虚拟仓库) |
兼容 Maven 1 等旧版本仓库(极少使用) | 适配 legacy 系统 |
Nexus 内置仓库(默认)
安装 Nexus 后,默认包含以下常用仓库:
| 仓库名称 | 类型 | 作用 |
|---|---|---|
Maven Central |
proxy | 代理 Maven 中央仓库(https://repo1.maven.org/maven2/),仅缓存 Release 版 |
Releases |
hosted | 存储团队内部的 Release 版构件(稳定版本,不可重复部署) |
Snapshots |
hosted | 存储团队内部的 Snapshot 版构件(开发中版本,可重复部署) |
3rd party |
hosted | 存储无法从公共仓库获取的第三方构件(如非开源 SDK) |
Public Repositories |
group | 聚合所有 Release 策略的仓库(如 Maven Central、Releases、3rd party),提供统一访问 URL |
Nexus 安装与初始化
安装 Nexus
- 下载:从 Nexus 官网 下载最新版本(推荐使用 OSS 开源版)。
- 启动:
- 解压后进入
bin目录,执行nexus.exe /run(Windows)或./nexus run(Linux/Mac)。 - 访问
http://localhost:8081,默认端口可在etc/nexus-default.properties中修改。
- 解压后进入
首次登录
- 点击右上角 Sign in,默认用户名
admin。 - 密码存储在
sonatype-work/nexus3/admin.password文件中,登录后需修改密码。
配置 Nexus 仓库(关键步骤)
开启远程索引(可选)
索引用于快速搜索仓库中的构件:
- 进入
Maven Central仓库(proxy 类型)。 - 点击 Configuration,将
Download Remote Indexes设为True,保存后 Nexus 会自动同步中央仓库索引。
配置仓库组(Group)
仓库组可聚合多个仓库,简化项目配置:
- 进入 Repositories → Create repository → 选择
maven2 (group)。 - 填写
Name(如my-group),在Member Repositories中添加需要聚合的仓库(如Maven Central、Releases、Snapshots),注意排序(优先级从高到低)。 - 保存后,仓库组的访问 URL 为
http://localhost:8081/repository/my-group/。
项目使用私服(下载依赖)
项目需要配置私服地址,才能从私服下载依赖(包括缓存的公共构件和私有构件)。配置方式有两种:pom.xml(项目级)或 settings.xml(全局级)。
在 settings.xml 中配置(推荐)
全局生效,避免每个项目重复配置:
1 | <settings> |
配置镜像(替代默认中央仓库)
将私服设置为所有仓库的镜像,强制依赖从私服下载(推荐用于团队统一管理):
1 | <settings> |
mirrorOf>*表示所有依赖请求都通过该镜像(私服)处理,私服会自动从代理的仓库(如中央仓库)下载未缓存的构件。
部署构件到私服
将团队自研的构件(如 Jar 包)部署到 Nexus 宿主仓库,供其他项目依赖。
配置 pom.xml
在项目的 pom.xml 中指定部署地址(对应 Nexus 的 Releases 和 Snapshots 仓库):
1 | <project> |
- 注意:
id需与settings.xml中server的id一致(用于身份验证)。
配置私服认证(settings.xml)
部署构件到 Nexus 需验证身份,在 settings.xml 中配置用户名和密码:
1 | <settings> |
执行部署命令
部署 Snapshot 版:版本号以
-SNAPSHOT结尾(如1.0.0-SNAPSHOT),执行:1
mvn clean deploy # 自动部署到 Snapshots 仓库,支持重复部署
部署 Release 版:版本号为稳定版本(如
1.0.0),执行:1
mvn clean deploy # 部署到 Releases 仓库,不可重复部署(需修改版本号)
Nexus 权限管理
为确保私服安全,需配置不同角色的权限(如开发人员只能下载,管理员可上传):
- 创建权限(Privileges):Nexus 内置多种权限(如
nx-repository-view-maven2-releases-read),可直接使用或自定义。 - 创建角色(Roles):组合多个权限,如
developer角色仅授予读取权限,admin角色授予读写权限。 - 创建用户(Users):为团队成员创建账号,分配对应的角色(如给开发人员分配
developer角色)。
操作路径:Nexus 控制台 → Security → 依次配置 Privileges、Roles、Users。
最佳实践
- 区分 Release 与 Snapshot:
Snapshot用于开发中版本(允许重复部署,后缀-SNAPSHOT)。Release用于稳定版本(不可重复部署,无后缀)。
- 代理国内仓库:将
Maven Central替换为阿里云仓库(https://maven.aliyun.com/repository/public),加速依赖下载。 - 定期清理缓存:在 Nexus 中配置定时任务(如
Purge unused artifacts),删除长期未使用的构件,节省磁盘空间。 - 备份仓库数据:定期备份
sonatype-work/nexus3/blobs目录,避免数据丢失。