Spring MVC DispatcherServlet 详解:前端控制器的配置、源码与核心流程
DispatcherServlet 是 Spring MVC 的前端控制器(Front Controller),作为整个框架的入口,统一接收并调度所有 HTTP 请求,协调 HandlerMapping、HandlerAdapter、ViewResolver 等组件完成请求处理与响应生成。其核心价值在于解耦组件依赖,通过 “统一入口 + 策略模式” 让各组件专注于单一职责(如 URL 映射、参数绑定、视图渲染)。从 “配置方式→初始化流程→请求处理流程→核心组件协作” 四个维度,彻底解析 DispatcherServlet 的工作机制。
DispatcherServlet 核心定位与配置
DispatcherServlet 本质是一个标准的 Servlet(继承 HttpServlet),需在 Web 应用中配置才能生效。根据 Servlet 版本不同,分为 web.xml 配置(Servlet 2.5 及以下)和 注解配置(Servlet 3.0+)两种方式。
1. 传统配置:web.xml 方式
通过 web.xml 声明 DispatcherServlet,指定配置文件路径、映射规则及静态资源处理策略,是早期项目的主流配置方式。
完整 web.xml 配置示例
1
2
3
4
5
6
7
8
9
10
11
12
13
14
15
16
17
18
19
20
21
22
23
24
25
26
27
28
29
30
31
32
33
34
35
36
37
38
39
40
| <?xml version="1.0" encoding="UTF-8"?>
<web-app xmlns="http://xmlns.jcp.org/xml/ns/javaee" version="4.0">
<servlet-mapping>
<servlet-name>default</servlet-name>
<url-pattern>*.html</url-pattern>
</servlet-mapping>
<servlet>
<servlet-name>DispatcherServlet</servlet-name>
<servlet-class>org.springframework.web.servlet.DispatcherServlet</servlet-class>
<init-param>
<param-name>contextConfigLocation</param-name>
<param-value>classpath:springmvc.xml</param-value>
</init-param>
<load-on-startup>1</load-on-startup>
</servlet>
<servlet-mapping>
<servlet-name>DispatcherServlet</servlet-name>
<url-pattern>/</url-pattern>
</servlet-mapping>
<listener>
<listener-class>org.springframework.web.context.ContextLoaderListener</listener-class>
</listener>
<context-param>
<param-name>contextConfigLocation</param-name>
<param-value>classpath:applicationContext.xml</param-value>
</context-param>
</web-app>
|
关键配置解析
| 配置项 |
作用描述 |
init-param: contextConfigLocation |
指定 Spring MVC 配置文件路径(如 classpath:springmvc.xml),若不配置则默认加载 /WEB-INF/DispatcherServlet-servlet.xml |
load-on-startup: 1 |
容器启动时初始化 DispatcherServlet,避免首次请求时的初始化延迟;值越小,初始化优先级越高 |
url-pattern: / |
拦截所有未被其他 Servlet 匹配的请求(如 /user/list、/api/login),但不拦截 .jsp(由 Tomcat 的 JspServlet 处理) |
静态资源映射(default Servlet) |
将 .html 等静态资源交给容器默认 Servlet 处理,避免 DispatcherServlet 拦截无法解析 |
2. 现代配置:Servlet 3.0+ 注解方式
Servlet 3.0 规范支持 “无 XML 配置”,Spring 通过 WebApplicationInitializer 接口实现自动注册。只需继承 AbstractAnnotationConfigDispatcherServletInitializer 并实现核心方法,即可替代 web.xml。
注解配置示例
1
2
3
4
5
6
7
8
9
10
11
12
13
14
15
16
17
18
19
20
21
22
23
24
25
26
27
28
29
30
31
32
33
34
35
36
37
38
39
40
41
42
43
44
45
46
47
48
49
50
51
52
53
54
55
56
57
58
59
60
| import org.springframework.web.servlet.support.AbstractAnnotationConfigDispatcherServletInitializer;
public class MyDispatcherServletInitializer extends AbstractAnnotationConfigDispatcherServletInitializer {
@Override
protected Class<?>[] getRootConfigClasses() {
return new Class[]{RootConfig.class};
}
@Override
protected Class<?>[] getServletConfigClasses() {
return new Class[]{WebConfig.class};
}
@Override
protected String[] getServletMappings() {
return new String[]{"/"};
}
}
import org.springframework.context.annotation.ComponentScan;
import org.springframework.context.annotation.Configuration;
import org.springframework.stereotype.Controller;
@Configuration
@ComponentScan(basePackages = "com.example", excludeFilters = {
@ComponentScan.Filter(type = org.springframework.context.annotation.FilterType.ANNOTATION, value = Controller.class)
})
public class RootConfig {
}
import org.springframework.context.annotation.ComponentScan;
import org.springframework.context.annotation.Configuration;
import org.springframework.stereotype.Controller;
import org.springframework.web.servlet.config.annotation.EnableWebMvc;
@Configuration
@EnableWebMvc
@ComponentScan(basePackages = "com.example", includeFilters = {
@ComponentScan.Filter(type = org.springframework.context.annotation.FilterType.ANNOTATION, value = Controller.class)
})
public class WebConfig {
}
|
注解配置与 web.xml 的对应关系
| 注解配置方法 |
对应 web.xml 配置 |
作用 |
getRootConfigClasses() |
<context-param> + ContextLoaderListener |
加载业务层配置,创建根容器 |
getServletConfigClasses() |
<servlet> 的 init-param |
加载 MVC 层配置,创建子容器 |
getServletMappings() |
<servlet-mapping> |
配置 DispatcherServlet 映射路径 |
3. 静态资源处理问题与解决方案
当 url-pattern 配置为 / 时,DispatcherServlet 会拦截所有请求(包括静态资源如 .js、.css、图片),但它仅处理动态请求,无法解析静态资源,导致 404 错误。需通过以下两种方式解决:
方案 1:mvc:default-servlet-handler(XML 配置)
1
2
3
4
5
6
|
<mvc:default-servlet-handler default-servlet-name="default"/>
<mvc:annotation-driven/>
|
方案 2:mvc:resources(细粒度控制)
1
2
3
|
<mvc:resources mapping="/static/**" location="classpath:/static/" cache-period="31536000"/>
<mvc:resources mapping="/images/**" location="/WEB-INF/images/" cache-period="31536000"/>
|
核心原理
mvc:default-servlet-handler:注册 DefaultServletHttpRequestHandler,将未匹配 @RequestMapping 的请求(如静态资源)转发给容器默认 Servlet;mvc:annotation-driven:注册 RequestMappingHandlerMapping、RequestMappingHandlerAdapter 等核心组件,修复 mvc:default-servlet-handler 导致的 @RequestMapping 失效问题。
DispatcherServlet 初始化流程(源码解析)
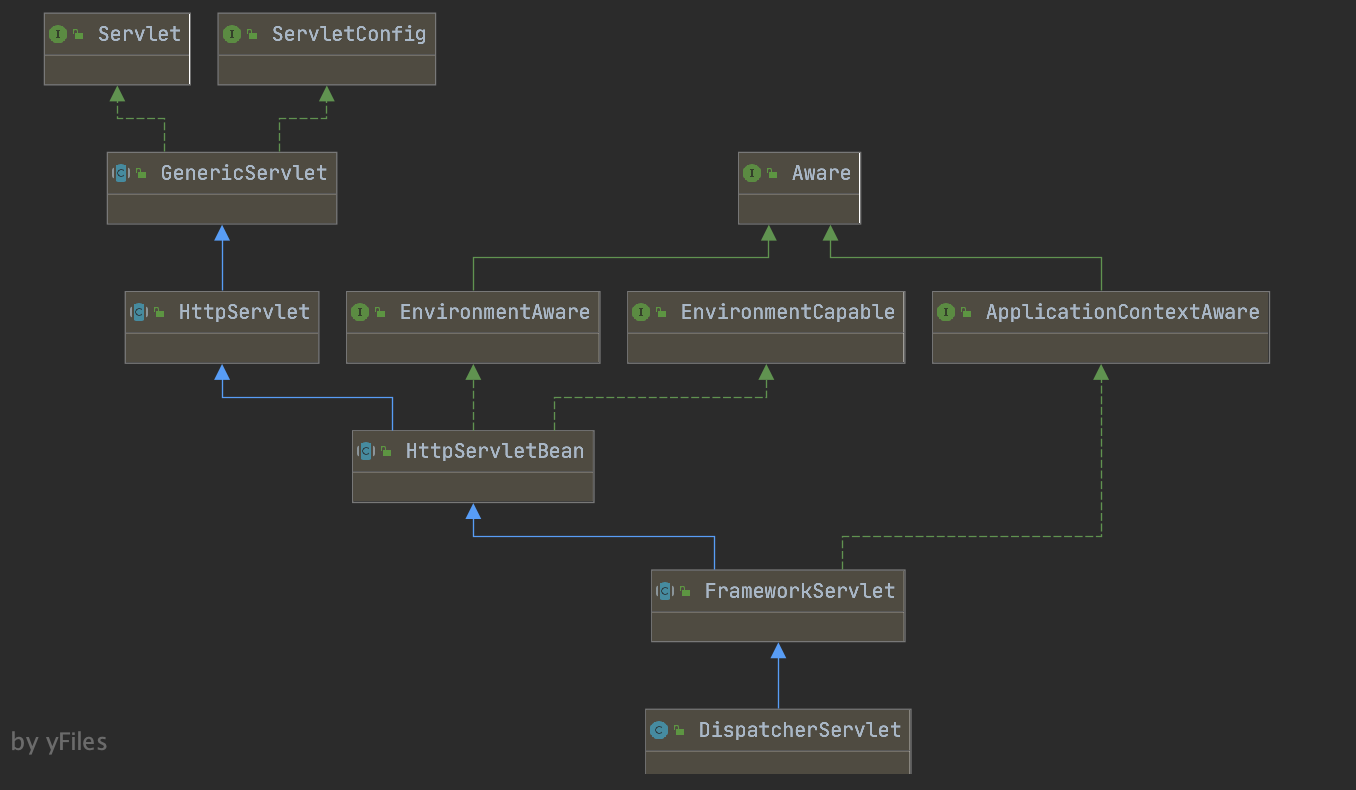
DispatcherServlet 的初始化本质是 Servlet 生命周期的 init() 方法,通过继承链(DispatcherServlet → FrameworkServlet → HttpServletBean → HttpServlet)完成上下文创建、策略组件初始化等工作。
1. 继承链与初始化入口
DispatcherServlet 的继承关系决定了初始化流程的调用顺序:
![DispatcherServlet结构]()
1
2
3
4
|
public class DispatcherServlet extends FrameworkServlet { ... }
public abstract class FrameworkServlet extends HttpServletBean implements ApplicationContextAware { ... }
public abstract class HttpServletBean extends HttpServlet implements EnvironmentCapable, EnvironmentAware { ... }
|
初始化入口是 HttpServletBean 的 init() 方法(Servlet 容器调用),最终触发 DispatcherServlet 的 initStrategies() 方法,初始化所有核心策略组件。
2. 核心初始化流程(源码拆解)
![DispatcherServlet处理过程]()
步骤 1:HttpServletBean#init () —— 初始化参数注入
1
2
3
4
5
6
7
8
9
10
11
12
13
14
15
16
17
18
| public final void init() throws ServletException {
PropertyValues pvs = new ServletConfigPropertyValues(getServletConfig(), this.requiredProperties);
if (!pvs.isEmpty()) {
try {
BeanWrapper bw = PropertyAccessorFactory.forBeanPropertyAccess(this);
bw.registerCustomEditor(Resource.class, new ResourceEditor(new ServletContextResourceLoader(getServletContext()), getEnvironment()));
initBeanWrapper(bw);
bw.setPropertyValues(pvs, true);
} catch (BeansException ex) {
throw ex;
}
}
initServletBean();
}
|
步骤 2:FrameworkServlet#initServletBean () —— 创建 Web 上下文
1
2
3
4
5
6
7
8
9
10
11
12
13
14
15
16
17
18
19
20
21
22
23
24
25
26
27
28
29
30
31
32
33
34
35
36
37
38
39
40
41
42
43
44
45
46
47
| protected final void initServletBean() throws ServletException {
this.webApplicationContext = initWebApplicationContext();
initFrameworkServlet();
}
protected WebApplicationContext initWebApplicationContext() {
WebApplicationContext rootContext = WebApplicationContextUtils.getWebApplicationContext(getServletContext());
WebApplicationContext wac = null;
if (this.webApplicationContext != null) {
wac = this.webApplicationContext;
if (wac instanceof ConfigurableWebApplicationContext) {
ConfigurableWebApplicationContext cwac = (ConfigurableWebApplicationContext) wac;
if (!cwac.isActive()) {
cwac.setParent(rootContext);
configureAndRefreshWebApplicationContext(cwac);
}
}
}
if (wac == null) {
wac = findWebApplicationContext();
}
if (wac == null) {
wac = createWebApplicationContext(rootContext);
}
if (!this.refreshEventReceived) {
onRefresh(wac);
}
if (this.publishContext) {
String attrName = getServletContextAttributeName();
getServletContext().setAttribute(attrName, wac);
}
return wac;
}
|
步骤 3:DispatcherServlet#onRefresh () —— 初始化策略组件
onRefresh() 是 DispatcherServlet 初始化的核心,通过 initStrategies() 注册 9 个核心策略组件(如 HandlerMapping、HandlerAdapter),若未手动配置则使用默认实现(读取 DispatcherServlet.properties):
1
2
3
4
5
6
7
8
9
10
11
12
13
14
15
16
17
18
| @Override
protected void onRefresh(ApplicationContext context) {
initStrategies(context);
}
protected void initStrategies(ApplicationContext context) {
initMultipartResolver(context);
initLocaleResolver(context);
initThemeResolver(context);
initHandlerMappings(context);
initHandlerAdapters(context);
initHandlerExceptionResolvers(context);
initRequestToViewNameTranslator(context);
initViewResolvers(context);
initFlashMapManager(context);
}
|
步骤 4:默认组件配置(DispatcherServlet.properties)
若未手动配置上述组件,Spring 会读取 org/springframework/web/servlet/DispatcherServlet.properties 中的默认实现:
1
2
3
4
5
6
7
8
9
10
11
12
13
14
|
org.springframework.web.servlet.LocaleResolver=org.springframework.web.servlet.i18n.AcceptHeaderLocaleResolver
org.springframework.web.servlet.HandlerMapping=org.springframework.web.servlet.handler.BeanNameUrlHandlerMapping,\
org.springframework.web.servlet.mvc.annotation.DefaultAnnotationHandlerMapping
org.springframework.web.servlet.HandlerAdapter=org.springframework.web.servlet.mvc.HttpRequestHandlerAdapter,\
org.springframework.web.servlet.mvc.SimpleControllerHandlerAdapter,\
org.springframework.web.servlet.mvc.annotation.AnnotationMethodHandlerAdapter
org.springframework.web.servlet.ViewResolver=org.springframework.web.servlet.view.InternalResourceViewResolver
|
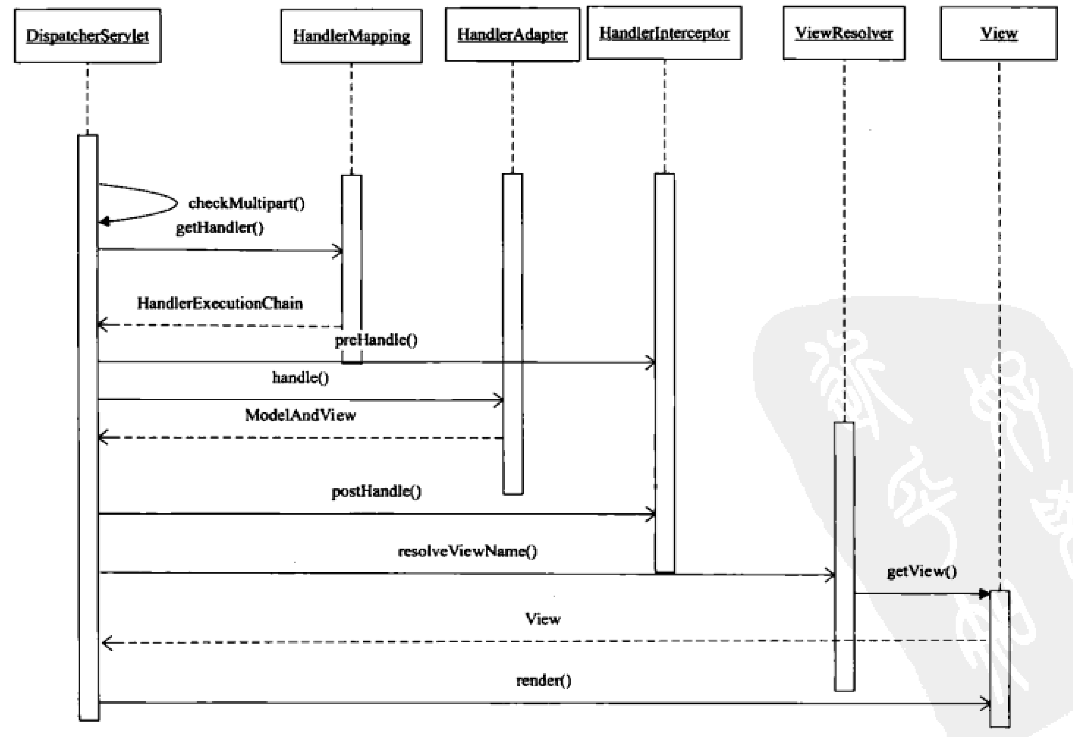
DispatcherServlet 请求处理流程(源码解析)
当 HTTP 请求到达 DispatcherServlet 后,通过 doGet()/doPost() 最终调用 doDispatch() 方法,完成 “请求接收→Handler 查找→拦截器执行→Handler 调用→视图渲染” 的全流程。
1. 核心流程入口:doDispatch ()
![doDispatch处理]()
doDispatch() 是请求处理的 “总指挥”,代码逻辑虽长,但可拆解为 7 个关键步骤:
1
2
3
4
5
6
7
8
9
10
11
12
13
14
15
16
17
18
19
20
21
22
23
24
25
26
27
28
29
30
31
32
33
34
35
36
37
38
39
40
41
42
43
44
45
46
47
48
49
50
51
52
53
54
55
56
57
58
59
60
61
62
63
64
65
66
67
68
69
70
71
72
73
74
75
76
77
78
79
80
81
82
83
84
| protected void doDispatch(HttpServletRequest request, HttpServletResponse response) throws Exception {
HttpServletRequest processedRequest = request;
HandlerExecutionChain mappedHandler = null;
boolean multipartRequestParsed = false;
WebAsyncManager asyncManager = WebAsyncUtils.getAsyncManager(request);
try {
ModelAndView mv = null;
Exception dispatchException = null;
try {
processedRequest = checkMultipart(request);
multipartRequestParsed = (processedRequest != request);
mappedHandler = getHandler(processedRequest);
if (mappedHandler == null || mappedHandler.getHandler() == null) {
noHandlerFound(processedRequest, response);
return;
}
HandlerAdapter ha = getHandlerAdapter(mappedHandler.getHandler());
String method = request.getMethod();
boolean isGet = "GET".equals(method);
if (isGet || "HEAD".equals(method)) {
long lastModified = ha.getLastModified(request, mappedHandler.getHandler());
if (new ServletWebRequest(request, response).checkNotModified(lastModified) && isGet) {
return;
}
}
if (!mappedHandler.applyPreHandle(processedRequest, response)) {
return;
}
mv = ha.handle(processedRequest, response, mappedHandler.getHandler());
if (asyncManager.isConcurrentHandlingStarted()) {
return;
}
applyDefaultViewName(processedRequest, mv);
mappedHandler.applyPostHandle(processedRequest, response, mv);
} catch (Exception ex) {
dispatchException = ex;
} catch (Throwable err) {
dispatchException = new NestedServletException("Handler dispatch failed", err);
}
processDispatchResult(processedRequest, response, mappedHandler, mv, dispatchException);
} catch (Exception ex) {
triggerAfterCompletion(processedRequest, response, mappedHandler, ex);
} catch (Throwable err) {
triggerAfterCompletion(processedRequest, response, mappedHandler,
new NestedServletException("Handler processing failed", err));
} finally {
if (asyncManager.isConcurrentHandlingStarted()) {
if (mappedHandler != null) {
mappedHandler.applyAfterConcurrentHandlingStarted(processedRequest, response);
}
} else {
if (multipartRequestParsed) {
cleanupMultipart(processedRequest);
}
}
}
}
|
2. 关键步骤详解
(1)步骤 2:getHandler () —— 查找匹配的 Handler
通过遍历 handlerMappings(如 RequestMappingHandlerMapping),根据请求 URL 匹配对应的 Handler(通常是 HandlerMethod,封装 Controller 方法),并封装为 HandlerExecutionChain(包含 Handler 和拦截器):
1
2
3
4
5
6
7
8
9
| protected HandlerExecutionChain getHandler(HttpServletRequest request) throws Exception {
for (HandlerMapping hm : this.handlerMappings) {
HandlerExecutionChain handler = hm.getHandler(request);
if (handler != null) {
return handler;
}
}
return null;
}
|
以 RequestMappingHandlerMapping 为例,会根据 @RequestMapping 注解的 value、method 等属性匹配请求,返回对应的 HandlerMethod(如 UserController.getUserList() 方法)。
(2)步骤 3:getHandlerAdapter () —— 查找匹配的 HandlerAdapter
HandlerAdapter 是 “适配器”,解决 “DispatcherServlet 如何调用不同类型 Handler” 的问题。通过遍历 handlerAdapters,找到支持当前 Handler 类型的适配器(如 RequestMappingHandlerAdapter 适配 HandlerMethod):
1
2
3
4
5
6
7
8
| protected HandlerAdapter getHandlerAdapter(Object handler) throws ServletException {
for (HandlerAdapter ha : this.handlerAdapters) {
if (ha.supports(handler)) {
return ha;
}
}
throw new ServletException("No adapter for handler [" + handler + "]");
}
|
(3)步骤 5/9:拦截器执行(preHandle → postHandle → afterCompletion)
HandlerExecutionChain 中的拦截器按以下顺序执行:
- preHandle():Handler 执行前调用,正序执行(配置顺序 1→2→3),返回
false 则终止流程;
- postHandle():Handler 执行后、视图渲染前调用,反序执行(3→2→1),可修改
ModelAndView;
- afterCompletion():视图渲染后调用,反序执行(3→2→1),用于释放资源(如关闭流),无论是否异常都会执行。
核心代码(applyPreHandle):
1
2
3
4
5
6
7
8
9
10
11
12
13
14
| boolean applyPreHandle(HttpServletRequest request, HttpServletResponse response) throws Exception {
HandlerInterceptor[] interceptors = getInterceptors();
if (!ObjectUtils.isEmpty(interceptors)) {
for (int i = 0; i < interceptors.length; i++) {
HandlerInterceptor interceptor = interceptors[i];
if (!interceptor.preHandle(request, response, this.handler)) {
triggerAfterCompletion(request, response, null);
return false;
}
this.interceptorIndex = i;
}
}
return true;
}
|
(4)步骤 6:ha.handle () —— 调用 Handler 业务逻辑
通过 HandlerAdapter 调用 Handler 的核心方法(如 Controller 方法),以 RequestMappingHandlerAdapter 为例,会完成参数绑定、数据校验、方法反射调用等工作:
1
2
3
4
5
6
7
8
9
10
11
12
13
14
15
16
17
18
19
20
21
22
23
24
| @Override
protected ModelAndView handleInternal(HttpServletRequest request,
HttpServletResponse response, HandlerMethod handlerMethod) throws Exception {
ModelAndView mav;
checkRequest(request);
if (this.synchronizeOnSession) {
HttpSession session = request.getSession(false);
if (session != null) {
Object mutex = WebUtils.getSessionMutex(session);
synchronized (mutex) {
mav = invokeHandlerMethod(request, response, handlerMethod);
}
} else {
mav = invokeHandlerMethod(request, response, handlerMethod);
}
} else {
mav = invokeHandlerMethod(request, response, handlerMethod);
}
return mav;
}
|
invokeHandlerMethod() 会通过反射调用 Controller 方法,并返回 ModelAndView(封装模型数据和逻辑视图名)。
(5)步骤 10:processDispatchResult () —— 视图渲染与异常处理
- 正常流程:若
ModelAndView 不为空,调用 render() 方法渲染视图(如 JSP 解析、Thymeleaf 模板填充);
- 异常流程:若存在
dispatchException,调用 processHandlerException() 处理异常(通过 HandlerExceptionResolver 生成错误视图)。
核心代码:
1
2
3
4
5
6
7
8
9
10
11
12
13
14
15
16
17
18
19
20
21
22
23
24
25
26
27
28
29
| private void processDispatchResult(HttpServletRequest request, HttpServletResponse response,
HandlerExecutionChain mappedHandler, ModelAndView mv, Exception exception) throws Exception {
boolean errorView = false;
if (exception != null) {
if (exception instanceof ModelAndViewDefiningException) {
mv = ((ModelAndViewDefiningException) exception).getModelAndView();
} else {
Object handler = (mappedHandler != null ? mappedHandler.getHandler() : null);
mv = processHandlerException(request, response, handler, exception);
errorView = (mv != null);
}
}
if (mv != null && !mv.wasCleared()) {
render(mv, request, response);
if (errorView) {
WebUtils.clearErrorRequestAttributes(request);
}
}
if (mappedHandler != null) {
mappedHandler.triggerAfterCompletion(request, response, null);
}
}
|
DispatcherServlet 核心职责总结
DispatcherServlet 作为 Spring MVC 的 “大脑”,核心职责可概括为 “初始化策略组件 + 统一调度请求”:
- 初始化阶段:
- 创建 Web 子容器,关联根容器(业务层 Bean);
- 初始化 9 个核心策略组件(HandlerMapping、HandlerAdapter 等),支持灵活扩展。
- 请求处理阶段:
- 接收所有 HTTP 请求,统一入口;
- 查找匹配的 Handler 和拦截器;
- 执行拦截器的 preHandle 方法;
- 调用 Handler 处理业务逻辑;
- 执行拦截器的 postHandle 方法;
- 渲染视图或处理异常;
- 执行拦截器的 afterCompletion 方法,清理资源。
- 解耦与扩展:
- 通过策略模式(如不同的 HandlerMapping、ViewResolver)支持灵活扩展;
- 隔离组件依赖,各组件专注于单一职责(URL 映射、参数绑定、视图渲染)。
关键问题与最佳实践
1. 为什么 url-pattern 配置为 / 而非 /*?
/*:拦截所有请求(包括 .jsp),而 JSP 由 Tomcat 的 JspServlet 处理,DispatcherServlet 无法解析 JSP,导致 404;/:拦截所有未被其他 Servlet 匹配的请求(不包括 .jsp),符合 MVC 处理动态请求、容器处理静态资源的分工。
2. 父子容器的关系与作用?
- 根容器:由
ContextLoaderListener 创建,管理 Service、Dao 等业务层 Bean;
- 子容器:由 DispatcherServlet 创建,管理 Controller、HandlerMapping 等 Web 层 Bean;
- 访问规则:子容器可访问根容器的 Bean(如 Controller 注入 Service),根容器不可访问子容器的 Bean(解耦业务层与 Web 层)。
3. 如何自定义策略组件?
只需在 Spring 配置中注册自定义组件(如自定义 HandlerMapping),DispatcherServlet 会优先使用手动配置的组件,而非默认实现:
1
2
3
4
5
6
7
|
@Bean
public HandlerMapping customHandlerMapping() {
BeanNameUrlHandlerMapping mapping = new BeanNameUrlHandlerMapping();
mapping.setOrder(Ordered.HIGHEST_PRECEDENCE);
return mapping;
}
|
总结
DispatcherServlet 是 Spring MVC 的核心,通过 “统一入口 + 策略模式” 实现了组件解耦与灵活扩展。理解其初始化流程(策略组件注册)和请求处理流程(Handler 查找→拦截器执行→视图渲染),是掌握 Spring MVC 底层逻辑的关键。无论是传统 web.xml 配置还是现代注解配置,其核心职责始终是协调各组件完成请求处理,为开发者提供低耦合、高扩展的 Web 开发框架